PROJECT PROPOSAL
I have chosen to do natural world because I love wondrous places, I love looking at star trails, sun rays breaking through the clouds, close up insects and much more. I have all the equipment needed for natural world photography. I have macro, telephoto and a 50mm lens, I have a timelapse trigger to create star trails and I have patience, which is an important factor for insect photography. I love doing slow shutter speeds of water which is why Padley Gorge is a great place for waterfalls. I have researched a lot about astro photography, including the intervalometer, which takes a certain number of photos over whatever period of time that you set it. I have just bought some heat pads that I will wrap around the lens to stop it from condensing because of the cold. When we went to the lake District, I woke up at midnight, just as the moon went below the horizon so there is no extra light other than the stars, then I put my camera on the tripod which was already set up in the correct position. After half an hour of taking photos of the stars I decided to try star trails, however the battery had completely gone because of the cold, luckily I had a spare, but half an hour is too short for a star trail. After I had been outside for a while I could see more, the milky way had become visible. I moved my camera towards another direction (where the milky way was), unfortunately the camera was slightly out of focus and because I used the tents in the foreground to focus, I didn't have anything so I had to guess by focusing on infinity.
Mind map

Inspiration
Here is a link to my pinterest board of natural world, It has all the inspiration and some of the artists that I have found and used-
https://www.pinterest.co.uk/jameswfleet/natural-world/
https://www.pinterest.co.uk/jameswfleet/natural-world/
ARTIST RESEARCH
The following are a list of artists who I have I chosen to evaluate. I chose the artists (photographers) as they experiment with different styles and techniques.
- Nick Tsiatinis
- Laurie Campbell
- Lincoln Harrison
- Matthew Oxley
- Tom Dowd
- Cerf Ecosse
Nick Tsiatinis
About
Nick Tsiatinis is a landscape and natural world photographer situated in Leicestershire. He enjoys sea and water photography and has a lot of slow shutter speed shots on the beach in the evening. He also likes to travel a lot. Nick has won many awards for his stunning photos. The one photograph that I decided to interprate for my GCSE was the lions paw. I went to France on holiday this year so I knew I couldn't take any photos of lions paws, so I chose the Chateaus dog, Hector!
Artists photo and evaluation
|
Evaluation
I really like this photo and it's very abstract, I can tell a lot of this photograph was edited in Photoshop or Lightroom to bring out the texture in the paw with clarity, he also increased the whites and highlights since it is really blown out around the right of the photo. This photo is good because your eye reads the photo from left to right so your eye follows the toes of the lion and up to the foot. However, I think the texture of the ground is annoying because my eye is drawn to that rather than the subject. |

|
My interpretation of Nick Tsiatinis
For this photo I will use a dogs paw along with broken twigs and leaves in case the dog falls asleep on a flat surface. I am going to use my 18-55mm lens or the macro lens to get the optimum sharpness. After I have got the photos I will upload them into silver effects pro which, I think is the best black and white photo editor that I have seen. I will increase the clarity to define the fine hairs of the fur and make the whites whiter in lightroom.
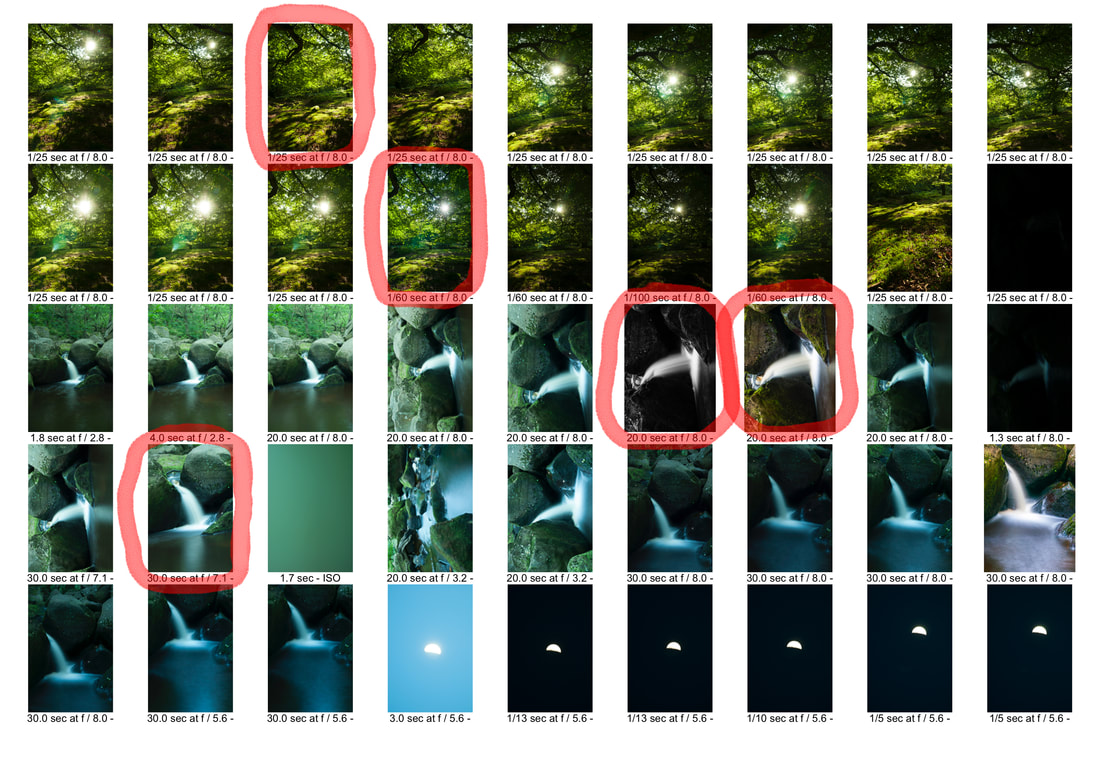
1. Contact sheet- (selected photos highlighted in red)

2. Planning for photoshoot
This was the shortest photo-shoot that I have completed because I knew that part way through it had had got the photo I was looking for. It was already well cropped and in focus. Using broken sticks and leaves was a bad idea because it didn't look natural. The lighting was very good on that day so I didn't need any artificial flash or light. I used my macro lens for optimum sharpness which helped a lot.
3. Photo selection


4. Evaluation of selected photos
I like all three photos but I only really like the left one, although it is tightly cropped. The photo was taken with a high ISO of 600 so the noise is quite high, this is visible in the background. In light-room afterwards I increased the clarity to define the texture of the paw.
5. My chosen image for interpretation

6. Final evaluation
Although this photo is a dogs paw and not a lions like it was meant to be, everything is like the photo I tried to recreate. The photo is a little blown out like the original photo is and its the same shades of black and white like the original. I took the photo of the dog (Hector) while he was lay on the stone paving slabs rather than twigs and leaves to stop the eye from being drawn to the floor instead of the main subject.
In Lightroom I decreased the exposure slightly to darken the bottom paw and increased the clarity to define the textures on the paws and fur. When increasing and decreasing the whites and blacks I held down the alt key and increased the whites until parts of the screen turned to blue, then I would decrese the whites until the blue was gone. I did the same with the blacks but I decreased it until I saw red. I may have increased the sharpness to much since the background is a little grainy, however I was using an ISO of 600 so that might be the reason it is grainy.
In Lightroom I decreased the exposure slightly to darken the bottom paw and increased the clarity to define the textures on the paws and fur. When increasing and decreasing the whites and blacks I held down the alt key and increased the whites until parts of the screen turned to blue, then I would decrese the whites until the blue was gone. I did the same with the blacks but I decreased it until I saw red. I may have increased the sharpness to much since the background is a little grainy, however I was using an ISO of 600 so that might be the reason it is grainy.
Laurie Campbell
About
Campbell is an award winning landscape and natural world photographer, he is well known throughout Scotland and works for many big photo companies including RSPB IMAGES and GETTY IMAGES. Laurie is an author of several books including 'The wildlife photographs'. Campbell helps Scotland get more tourists by showing his award winning work to the world.
Selected photo and evaluation

Evaluation
I like the colours used to create this photo, I can't tell if the dandelion is being pointed up to the sun or in front of a lamp with a piece of yellow card held over the light source. The creativity of this photo is unique and the choice of flower is different. The rule of thirds has not been used since the flower is in the centre of the image. I am going to have to take this photo in spring when the dandelions are out. I want to find a flower which is more even and symmetrical than the one Campbell used. I will buy or make a clamp to stop the flower from moving. I will place a light source behind the flower with a orange filter over it. I will use the macro lens to get the best quality when the flower is that close to the lens and I will turn all the surrounding lights to eliminate all other light sources entering the image.
I like the colours used to create this photo, I can't tell if the dandelion is being pointed up to the sun or in front of a lamp with a piece of yellow card held over the light source. The creativity of this photo is unique and the choice of flower is different. The rule of thirds has not been used since the flower is in the centre of the image. I am going to have to take this photo in spring when the dandelions are out. I want to find a flower which is more even and symmetrical than the one Campbell used. I will buy or make a clamp to stop the flower from moving. I will place a light source behind the flower with a orange filter over it. I will use the macro lens to get the best quality when the flower is that close to the lens and I will turn all the surrounding lights to eliminate all other light sources entering the image.
My interpretation of Laurie Campbell
For this photograph, I chose to light a single flower with a plain black background. As with the artists picture, my aim was to make the flower the central element of the photograph with no distractions. The lighting of the flower was very important. However, rather than light the image from the rear to create a silhouette, I wanted to light the image from the front.
1. Contact sheet- (selected photos highlighted in red)


2. Planning for photo shoot
I experimented with both daylight and manual off camera flash initially. I chose not to use daylight as I couldn't control the direction of the light which ended up also lighting the background, as since I wanted a completely black background, this method was dismissed. Using the manual flash gave a black background, but the quality of the light was too harsh. Fortunately I had a cheap LED ring flash which gave a more natural smooth light which I could control.
This particular flower was chosen for its symmetry and colour. I had real problems trying to support the flower in order to take the picture and went through several different arrangements. Finnally I poked a cocktail stick into the bottom of the flower and card. I used masking tape to support the stick in the card. I began the shoot using a wide aperture of f2.8 but the depth of field meant that the parts of the image were not on focus. I ended up using around f.8 which meant the most of the image was in focus.
This particular flower was chosen for its symmetry and colour. I had real problems trying to support the flower in order to take the picture and went through several different arrangements. Finnally I poked a cocktail stick into the bottom of the flower and card. I used masking tape to support the stick in the card. I began the shoot using a wide aperture of f2.8 but the depth of field meant that the parts of the image were not on focus. I ended up using around f.8 which meant the most of the image was in focus.
3. Photo selection


4. Evaluation of selected photos
The most difficult part of taking the picture, apart from finding a way of holding the flower, was lighting it. The selected photos show the problems I encountered with lighting the flower.
The first image was over exposed with the flower too bright and the background lit. In the second image the background was solid black, but the flower was unexposed and dull. I then experimented with adding some additional flowers in the background, though it became cluttered, losing the focus of attention on the flower.
The first image was over exposed with the flower too bright and the background lit. In the second image the background was solid black, but the flower was unexposed and dull. I then experimented with adding some additional flowers in the background, though it became cluttered, losing the focus of attention on the flower.
5. My chosen image for interpretation

6. Final evaluation
For this image I took this picture on the table in an art classroom. It was my second time using a LED ring flash (the first time was when I was interpreting one of Andrea Clare's photos). The flower was positioned against a black background and the ring flash attached to the front of the lens. I had to use a tripod as I was using a long shutter speed. After taking lots of pictures, I found the flower looked better when it was lit from the side. This created depth using the light and shadows. The problem I had when taking this picture was stopping the ring flash from lighting up the background, so I ended up using Photoshop to produce a totally black background.
Lincoln Harrison
About
Lincoln Harrison takes a wide variety of astro images, and is an award winning natural world photographer. When he takes a night-time shot he leaves the camera for several hours so Harrison may get the smooth effect in the sky and even on the water, as seen in the image below. Lincoln doesn't care if there is a little bit of light pollution since it usually makes his photos looks better and even a bit unique because many astro photographers avoid the big cities or even small villages just so the maximum amount of stars are available to the camera to capture.
Selected photo and evaluation

I can see that Lincoln was very prepared to take this photo since when I tried a star trail up in the Lake District, the camera got really cold and the battery went in just under 1 hour. I have bought heat pads to wrap around the camera which will hopefully preserve the battery life.
I like how the photographer has used the rule of thirds too compose this image. The horizon, the foreground and Polaris are on the third of the frame.The foreground is interesting, Harrison has used a unique shaped stone with jagged formations protruding off it. The tree on the left third make the shot more appealing to the eye and your eye is drawn to the rock and then the tree in the background. To capture star trails you need a long shutter speed (usually 30 seconds), this will also effect water by making it smooth and solid looking, because Harrison has positsioned his camera towards a lake he will need the water to look smooth and textureless to draw your eye to the stars.
I like how the photographer has used the rule of thirds too compose this image. The horizon, the foreground and Polaris are on the third of the frame.The foreground is interesting, Harrison has used a unique shaped stone with jagged formations protruding off it. The tree on the left third make the shot more appealing to the eye and your eye is drawn to the rock and then the tree in the background. To capture star trails you need a long shutter speed (usually 30 seconds), this will also effect water by making it smooth and solid looking, because Harrison has positsioned his camera towards a lake he will need the water to look smooth and textureless to draw your eye to the stars.
My first attempt at star trails

Evaluation
I thought star trails would be easier to create than they were. I didn't think about light pollution which is a major issue where I live. The night that I planned happen to be a night with a few clouds in the sky which would ruin my star trail.
My interpretation of Lincoln Harrison
For this shot I decided to take pictures of the Milky Way due to difficulties I encountered trying to take star trial pictures.
1. Contact sheet- (selected photos highlighted in red)

2. Planning for the photo-shoot
On 1st of September my family and I wild camped in the lake district in the region of Buttermere. Before this I took an interest to astro photography and wanted to test out some ideas I had. However, I live in a village which is surrounded by large cities that give off a lot of light pollution so anywhere i look there was a orange glow.
When we reached Robinson (the mountain that we were camping on), we found out that if you looked towards the mountains and further into the lake district there was no light pollution for at least 30 miles. In the evening I created a time-lapse of the sun setting over the Welsh sea. Afterwards, I set up the tripod in the position I wanted it but the moon was too bright and it was lighting up the mountains in the background of my shot. I used the app 'clear outside' to calculate when the moon will set, so I set my alarm for that time and went to bed with my camera batteries in my sleeping bag with me to preserve the life of them. The alarm sounded at 1:00am whereupon I quickly got out of my sleeping bag, set up the camera on the already positioned tripod, making sure the camera settings set to f/2.8, ISO 3200 and a shutter speed of 30 seconds. I used my intervalometer to reduce camera shake and use a long shutter speed.
I noticed that milky way was directly overhead. I turned my tripod backwards to shoot the milky way as it falls below the horizon, however Cockermouth was in that direction so there was a little light pollution. When focusing, I thought I had to focus on infinity, but in fact you have to focus slightly off infinity so my photos are not as sharp as they could have been.
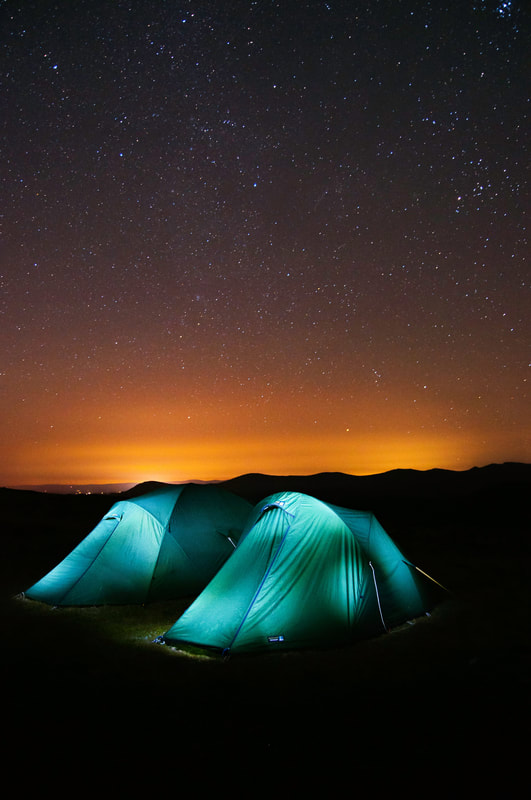
For the final shot of the night, I took a few photos of the stars with the Tera Nova tents in the foreground. I got my mum to light up one tent with a torch inside and my brother for the other. The light was concentrated and and not evenly spread around the tents which was an issue but it still worked (I changed my settings for this shot to f/2.8 ISO 800 and a shutter speed of 30). Next I changed the settings back to the original and got my dad to coat the tents in a white light from the outside and that worked a lot better.
When we reached Robinson (the mountain that we were camping on), we found out that if you looked towards the mountains and further into the lake district there was no light pollution for at least 30 miles. In the evening I created a time-lapse of the sun setting over the Welsh sea. Afterwards, I set up the tripod in the position I wanted it but the moon was too bright and it was lighting up the mountains in the background of my shot. I used the app 'clear outside' to calculate when the moon will set, so I set my alarm for that time and went to bed with my camera batteries in my sleeping bag with me to preserve the life of them. The alarm sounded at 1:00am whereupon I quickly got out of my sleeping bag, set up the camera on the already positioned tripod, making sure the camera settings set to f/2.8, ISO 3200 and a shutter speed of 30 seconds. I used my intervalometer to reduce camera shake and use a long shutter speed.
I noticed that milky way was directly overhead. I turned my tripod backwards to shoot the milky way as it falls below the horizon, however Cockermouth was in that direction so there was a little light pollution. When focusing, I thought I had to focus on infinity, but in fact you have to focus slightly off infinity so my photos are not as sharp as they could have been.
For the final shot of the night, I took a few photos of the stars with the Tera Nova tents in the foreground. I got my mum to light up one tent with a torch inside and my brother for the other. The light was concentrated and and not evenly spread around the tents which was an issue but it still worked (I changed my settings for this shot to f/2.8 ISO 800 and a shutter speed of 30). Next I changed the settings back to the original and got my dad to coat the tents in a white light from the outside and that worked a lot better.
Non natural world yet successful photos

|
|

|
3. Photo selection


4. Evaluation of selected photos
For the first photo that I have chosen is a landscape image of the milky way. This photo is not my favourite because there is too much foreground in the shot, however I like how in left of the shot, the foreground lifts up to cover a bit of negative space. Overall the photo is in focus and the shape of the foreground is interesting. The second photo on the list is a portrait image with a little amount of clouds. This picture is the most promising because it is the sharpest one that I have chosen. You can see the milky way in this image even before it has been processed in an editing software. There was a small amount of light pollution because I pointed my camera towards the Welsh sea. For the final image on the list is a view towards Keswick, the milky way is not visible in this photo because I positioned my camera in a different place and there is a lot more light pollution because Keswick is a town in the Lake District.
Before and after processing
Before
|
After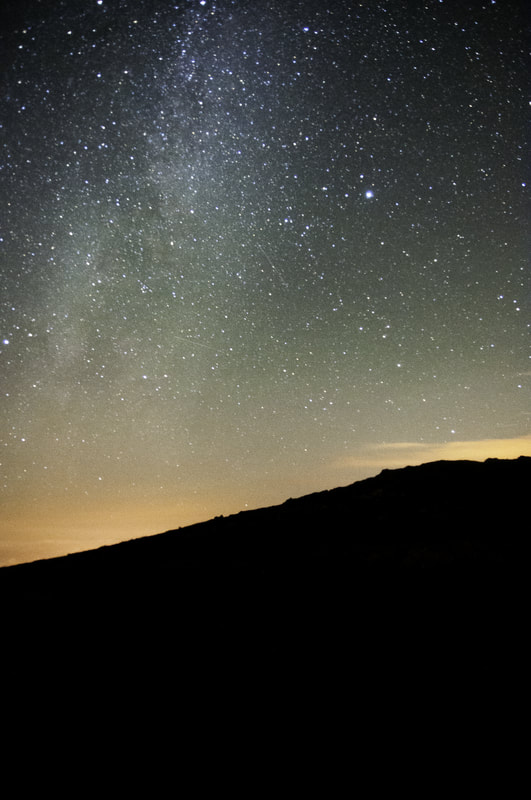
|
5. My chosen image for evaluation

6. Final evaluation
I think this photo-shoot was massively successful, the photos came out well and I had a few learning experiences. This shot was facing towards the Welsh Sea so there was a lot less light pollution than the other images on this photo-shoot. The milky way is clearly visible which was my main aim. The downside to this photo is that the shutter was open for 30 seconds which allowed shooting stars to appear in the image. Also some of the stars became too bright, which is bad because your eye is draw to them. I would have been happy is there was no light pollution in the shot because it would get rid of the divider between the sky and the land. I like how the foreground is a solid black. It draws your eye away because there is no detail and draws your eye towards the milky way.
Matthew Oxley
About
Matthew Oxley is typically a marine photographer who wins many awards like the UK wildlife photography award. I luckily found this shot that he took below that isn't sea life, since I couldn't do that.
Photo Evaluation

Evaluation
This photo is beautiful, I love the smooth water and the angle that the water is coming into the image. It reminds me of sugar falling onto a dark grey surface. The type of rock that this waterfall is on looks really smooth with sharp edges which fits in with the idea of smooth and soft. Your eye reads from left to right so your eye sees the pure white water then follows it down to the bottom of the frame. the rule of thirds has been broken in this photo since the waterfall is in the centre of the image. At the top right of the picture where the dark stream of water is, the water is barely noticeable if you glance at the image. The composition of the image suits the square frame because the rule of thirds has been used on the vertical side of the picture.
This photo is beautiful, I love the smooth water and the angle that the water is coming into the image. It reminds me of sugar falling onto a dark grey surface. The type of rock that this waterfall is on looks really smooth with sharp edges which fits in with the idea of smooth and soft. Your eye reads from left to right so your eye sees the pure white water then follows it down to the bottom of the frame. the rule of thirds has been broken in this photo since the waterfall is in the centre of the image. At the top right of the picture where the dark stream of water is, the water is barely noticeable if you glance at the image. The composition of the image suits the square frame because the rule of thirds has been used on the vertical side of the picture.
My interpretation of Matthew Oxley
For this photo I will travel to Padley Gorge which is my favourite place to shoot waterfalls. I will use a 30 second shutter speed with a high ISO. At the moment it is Autumn so I will need to remove any excess leaves that have fallen into the shot.
1. Contact sheet- (selected photos highlighted in red)


2. Planning for photoshoot
The idea that I have in mind for producing a replica of this photo is to travel down to Padley Gorge where there are lots of beautiful waterfalls, I will bring wellies and position myself right infront of the chosen waterfall, next I will change the setting on my camera to, ISO 200, shutter speed of 30 seconds and an aperture os f/2.8 to get the smooth water effect (slow shutter speed). I will bring the intervalometer with me to Padley Gorge to reduce camera shake when taking the photo because I am keeping the shutter open for a long time. I have also packed a inferred trigger release to use as a backup for the intervalometer if it somehow fails. I will bring my 18-55mm sigma lens and my 400mm telephoto lens in case the water close to the waterfall is too deep and I need to zoom in.
3. Photo selection


4. Evaluation of selected photos
The photoshoot at Padley Gorge and Stanage was really successful, I took a wide variety of photos by trying out a lot of my equipment. I used the gradual filter to get the dark effect on the top of the cliff in the Stanage Edge picture, I used the inferred trigger release to reduce camera shake when shooting the moon and I tried out the mist effect on the water by using a slow shutter speed. For the shot of the small waterfall I attached the intervalometer to my nikon d90 so it would reduce camera shake, therefore taking a sharper image. While I was at Stanage the weather was beautiful and the lighting was perfect. By the time I had left Stanage it was going dark so I had to be quick. When I arrived at Padley Gorge the sun had almost set, when I had reached the chosen point and set everything up, I could barley see, therefore I had to use a high ISO (around 800) and a long shutter speed of 30 seconds. Even though it was really dark the final image looked as if it was taken during the day.
My interpretation of Matthew Oxley - Before and after processing

|

|
Evaluation
This photo was taken at Padley Gorge in the evening, it was taken at a long shutter speed of 30 seconds and with the telephoto lens. Padley Gorge has been my favourite place for long shutter speed photography ever since I first went there. I purposely didn't use the rule of thirds because I tried to make it look the same as Matthew Oxley's. I uploaded the final photo in light-room, where I edited the exposure and highlights, then I opened the image in silver effects pro to get the same look as Oxley's image. I might have made the photo too dark, however the exposure looks the similar to the one I am trying to recreate. Although the texture of the mossy rock is unlike Matthew's I think it looks really beautiful. My camera's shutter only opens for a maximum of 30 seconds, which is what I used, however the water on the ground is not purely smooth, I can see a rough texture, whereas in Matthew's photo it is like a black, even surface. I like how the light is casting down on the image from the top left and hits the bottom right to make most of the corners light up in the photo.
Tom Dowd
About
Tom Dowd is not a professional natural world photographer, he mainly travels to exotic places and takes photos, whether it be natural or man made. One of my favourite photos by Tom Dowd was a blue ridge mountain, unfortunately it is impossible for me to interprate that in this amount of time because I am not traveling to mountain covered countries.
Photo Evaluation

Evaluation
This isn't the best photo of the moon that I have seen but, overall, the image is in focus, the rule of thirds has been used and its not a full moon, which is helpful because having a crescent moon is different and not seen much, photographers usually wait until the moon is full then take the photo that they were after. I like the contrast between the square frame and the slightly circular moon.
This isn't the best photo of the moon that I have seen but, overall, the image is in focus, the rule of thirds has been used and its not a full moon, which is helpful because having a crescent moon is different and not seen much, photographers usually wait until the moon is full then take the photo that they were after. I like the contrast between the square frame and the slightly circular moon.
My interpretation of Tom Dowd
For this shot I will wait until the moon is the largest in the sky. I will use my telephoto lens to get close to the moon and I have a wireless trigger so I can can the photo with the best sharpness. Also I will use the 'mirror-up' function on my camera to get the optimum detail. For the settings, I will use an aperture of f5.6, an ISO of 800 and a shutter speed of 1/400.
1. Contact sheet- (selected photos highlighted in red)

2. Planning for photo shoot
This photoshoot was taken while at Padley Gorge at night. I was just packing away after the Matthew Oxley photoshoot when I saw that the moon looked unusually large. I set up my camera on the tripod for the second time and entered live view to focus on the moon because it was too dark and far away to auto focus. I used the wireless trigger to get the best sharpness. Unfortunately for me it happened to bob on a windy night so the camera started shaking slightly. My dad parked the car next to the camera so that the car would hopefully shield it from the wind. This helped a lot.
3. Photo selection


4. Evaluation of selected photos
I can't say much about either of these photos since they both look extremely similar. However the moon is in focus on both of the images. The rule of thirds has been used on the left image, which is the only photography technique that has been used. There is light pollution on the moon due to cities which I will get rid of in photoshop by changing the white balance.
5. My chosen image for interpretation
Before
|
After
|
6. Final evaluation
This photo was taken at Padley Gorge, straight after the Matthew Oxley photo-shoot, This shot was not planned, I just happened to have my telephoto lens and the tripod. I used my intervolmeter to reduce the camera shake because even a gush of wind, which there was that night, could make the photo out of focus. I had to take the photo whenever the wind slowed down to get the best quality possible. I like how the moon is not a full moon because a full moon is more of a boring shape in the sky, having a crescent is a unique shape and not seen often. The moon was originally a yellowish hue because of the sun, in lightroom I used silver effects pro and changed the image to black and white. I have cropped the chosen image so that the moon is more visible and close to the viewer.
Cerf Ecosse
About
Cerf Ecosse is a French wildlife photographer who specialises with the life of a deer. Unfortunately he is also a deer hunter. Ecosse wakes up at dawn and arrives home at dusk, some of his shots are really appealing to the eye, the photo below is my favourite by far.
Artists photo and evaluation

I love this photo, the rule of thirds has been used really effectively and the sky is beautiful. The foreground doesn't reach the third of the image, however I think it looks better like that. I like how the foreground slopes down to the left and not a straight line. In many photos like this, the grass overwhelms the photo and draws your eye to th3e grass instead of the main subject (the deer). Ecosse has used a wide aperture, around f5.6 to get the sky out of focus. The eye reads from left to right, so if Ecosse flipped the photo horizontally, then it may look even better. Ecosse could have photo shopped the grass out of the deer antlers to clean the photo.
My interpretation of Cerf Ecosse
For this shot I will find a deer at Lyme Park and create a silhouette with the sun in the background.
1. Contact sheet- (selected photos highlighted in red)


2. Planning for photoshoot
I will go to Lyme Park at 7am to take photos of the deer for my Cerf Ecosse interpretation. Every Saturday morning I go to Lyme park to run and when I go through the gate I always see a small pack of deer. I will use my telephoto lens to capture the deer while they do not notice me. I need to walk around the deer to a position where the wind is hitting my face so they will not catch my scent. I will wear dark colours (preferably camouflage) so the deer will hopefully not spot me. I won't bring my tripod on this photoshoot because I need to stay light on my feet.
3. Photo selection


4. Evaluation of selected photos
I think that this photoshoot has been the most successful shoot I have ever done. When I arrived at Lyme Park on Saturday morning I count see the deer straight away so I got to Lyme cage and used my binoculars to view the land, sure enough I found them. As I approached them their scent was coming towards me (they couldn't smell me) which was a great sign. I hid behind a fallen tree and rested my camera on it because it was dark so I needed a longer shutter speed. After I took some beautiful shots from that position, the deer started to jump over a fence on bey one. As I got into the perfect position for this shot all the deer had crossed the fence so I missed my chance. The deer now knew where I was so they ran away. My previous etempt was a failure, it might have been because it was a big pack so they would notice me faster but I am not entirely sure. Overall this photoshoot was a great success and I achieved my goal. The first photo is a portrait image of a deer. This could make for an interesting shot since I have not seen many portrait images of deer. the second photo is too cluttered with grass and the viewer can't see its hooves. The third photo is the most promising, the deer had not noticed me at that point so its head was side on (the shape of the head is visible when it is a silhouette). The forth photo is similar to the third in that the head positioning is the same.
5. My final image for interpretation
Before
|
After
|
6. Final evaluation
This photo is the perfect example of the rule of thirds since the landscape and the deer are both on the third of the image. I used a high ISO of 600, after all it was at seven in the morning. The grass is not all over the ground which adds a sense of control to the surface of the foreground. I don't like how the top right hand corner is light, it looks like I purposely added a positive vignette. The photo would have looked better if the hills in the background weren't there. The deer's head is in the perfect position, if it was a little to the left or right the head would like warped or miss-shapen. The hair on the deer does not look messy or rough, instead it is clean and smooth apart from the odd area around its tail. This is a good example of natural world because there are no man made items in the photo.
First I changed the white balance by clicking on the most neutral area of the image (white spots). Then I cropped the photo so it was just the deer and one third of the grass was in the shot. I lowered the exposure so that the deer's feature's were only just visible. Next, I increased the contrast so that the deer was a silhouette. I held my finger down on the alt key so I could see where the complete white and black spots were. I adjusted the white and black sliders until there was no complete white or black spots. I boosted the saturation a bit to make the blues more brighter and increased the clarity a bit to define the edges of the deer and the grass.
Timelapse photography
Time-lapse is a series of images that have been taken about 5-20 seconds apart (depending on how fast the clouds are moving). This is almost always done with a intervalometer, which is a remote trigger that you set up to take a certain amount of photos over a certain period of time. When you get back you should download a plugin for lightroom which will allow you to play a slideshow at 25fps, instead of the lightroom one which is 18.5fps. This will make your video a lot smoother and less like a slideshow. This is a intervalometer below.

Photo-shoot 1 - Contact Sheets


Photoshoot evaluation
This is my most successful timelapse that I have done. It was a wonderful morning and the clouds were low. As soon as I woke up I jumped out of the tent and set my camera off in this time-lapse. While in the Lake District I was high above sea level, thats why the clouds weave in and out of the mountain in the shot.
Photo-shoot 2 - Contact sheets


Photoshoot evaluation
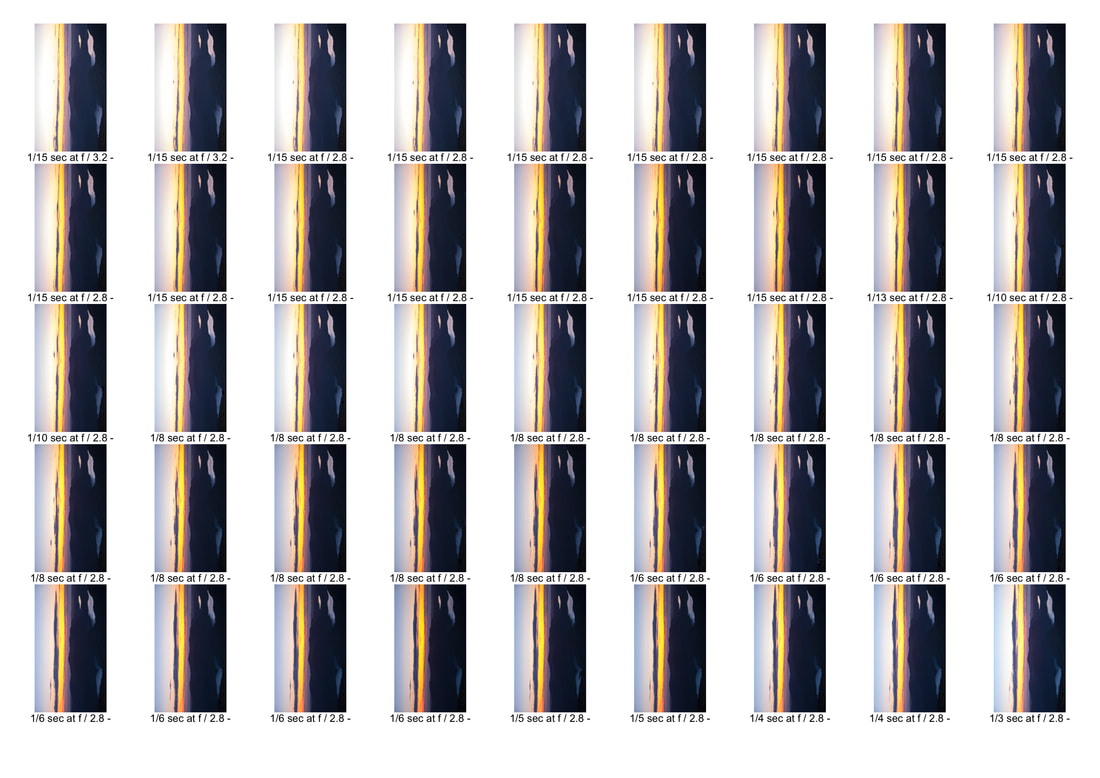
For this time-lapse I experimented with sunsets. I upped the ISO then the shutter speed whenever the light changed which kept the image at the perfect exposure. I included the three lakes as leading lines for the viewers eyes. I was hoping that I would get a timelapse that changed from day to being able to see stars, however I didn't understand the time it takes to turn night so I had to stop it earlier.
Photo-shoot 3 - Contact sheets


Photoshoot Evaluation
For this timelapse I traveled up to the shooting cabin on Middle Moore, this is something that I have never seen before. On this particular day the clouds kept getting harsher then lighter which changed the light of the image (thats what the flickering is). I composed the video so that the rule of thirds was used on almost every possible angle.
Hartland Quay photoshoot
While in Cornwall, I went to a place called Hartland quay, I noticed that there were many lines in the slanted rocks leading out to sea. I thought that a slow shutter speed when the tide was coming in would look great. I went back to the same beach before dusk so I had enough time to get prepared. While I waited I experimented with the neutral density filter and my tripod. When evening came I took the photo that I came for and I looked great.
1. Contact sheet- (selected photos highlighted in red)


2. Planning for photo shoot
For this shoot I will travel to a beach in Cornwall called Hartland Quay. I will etempt a slow shutter speed of the tide coming in with the leading lines of the rocks travelling out to sea. I will experiment with the neutral density filter that I have recently bought.
3. Photo selection


4. Evaluation of selected photos
I really like these photos. The first one is a perfect example of leading lines, however it is not a slow shutter speed which was one of my aims for this photo. The second image is exactly what I went out to take. It is using leading lines and a neutral density filter. It also has the rule of thirds on the top and right. The third photo on the list doesn't meet any of the aims in the criteria but I think, as a photo, it looks really good. It shows the viewer the power of Cornish waves. For the final image on the list, this doesn't meet any aims for the photoshoot, I just like the colour of the water and the composition of the photo. The rock on the left draws your eye towards the large wave.
5. My chosen image

6. Final evaluation
This is my favourite photo that I have ever taken so far. The leading lines in this photos are obvious, the rocks leading out to sea, but if you look closely, and have an eye for it, you can see that your eye starts at the bottom left and is draw up towards the furthest right triangle in the background. Your eye is then taken back down to the bottom right and then opens up to the whole image. The rule of thirds is well done in this photo because of the horizon and the right vertical side of the image. The white balance is good, there are subtle blues and oranges.The left side of the image is a lot brighter than the rest of the photo, this is because the sun had just appeared from around the cliff face and was lighting up that area. There is also no negative space, everything is covered in something.
Failures of the photo-shoot


When carrying out this photo-shoot I came across some difficult situations and I didn't know what caused them. After looking into it I found out that the purple hue of the image was because of light getting in through the back of the camera and due to the long shutter speed, that light effected the image. To overcome this problem I placed my hand of the viewfinder of the camera to stop any light from getting in.
Final presentation
Proposal
For my natural world exam I have got two boards of MDF and supported them on the back by four planks of wood. I have painted the two boards with black paint. I have drilled two hinges to the boards so that they can open and close, they can also support themselves if they are open slightly in a 'v' shape.I have drawn a majestic tree in white paint. I have cut out twelve thin planks of wood and painted them all white. I sent twelve of my best photos to DS colour labs so that the quality is the best. I used spray mount to stick my photos to the twelve boards. I created stencils of leaves and spary painted them to parts of the tree. I have drilled holes in the border of the tree so that I can poke fairy lights through and sellotape them in place. I have stuck the boards down onto the tree with wood glue. I have created a time-lapse film containing all my good videos on iMovie. I have exported it over to my laptop and will play the video in the exhibition. It will be placed on the bottom right of the tree to fill the negative space.
The making of the exhibition


The finished product

Evaluation
For the final presentation I got two large boards which I painted black and drilled support to the back of them. I connected a couple of hinges so that the boards could open and close. I planned out a tree in chalk so that I could easily rub it away with a damp cloth which would not ruin the black paint. Next, I painted the tree in white but I did not think that it stood out as well as it could have so I decided to add shadow to the left to give it a bit more texture. After that I cut out the shape of a leaf on cardboard and spray painted it to the board, I didn't think that was enough so I add extra paint to the leaf to give it a bit of definition. I bought 12 small wooden boards and painted them white. I then made DS colour labs print 12 of my favourite photos of natural world that I have taken over the course of my life. I used spray mount to glue the photos to the boards. I bought christmas tree fairy lights to act as stars which were drilled through the boards in numerical order and stuck down with masking tape. Finally I stuck the 12 boards onto the main two black boards with wood glue.
Overall I think the final presentation went really well. It was well planned and rather creative.
Overall I think the final presentation went really well. It was well planned and rather creative.
